

Low Calorie Zucchini Chips taste salty, crispy, and a little cheesy, and they totally satisfy that potato chip craving without wrecking your calories. They work perfectly for snackers who want something crunchy in about 30–40 minutes, including prep and baking time. I tested these while standing at my kitchen counter in socks with little avocados on them, so you know I take snacks seriously.
Why Make This Low Calorie Zucchini Chips at Home
Homemade zucchini chips let you control the oil, salt, and seasoning, so you keep the calories low and the flavor high. You skip weird additives and still get a crunchy, chip-style snack that fits into weight loss, low carb, and gluten free goals.
You also use up extra garden zucchini in a way that feels fun instead of like vegetable homework. Kids usually eat these without side eye, and adults appreciate a snack that tastes indulgent but still fits into a normal day of eating.
“These Low Calorie Zucchini Chips taste like a cross between kettle chips and veggie crisps, but my jeans fit better afterward. ★★★★★”
Ingredients You Need
-
Zucchini:
- 2 medium zucchini, firm and fresh, about 1 to 1.25 pounds total.
- Choose smaller to medium zucchini, since huge ones hold more water and turn soggy.
-
Oil:
- 1 to 1½ teaspoons olive oil or avocado oil.
- Spray oil works great if you want ultra low calories and super light coverage.
-
Salt:
- Fine sea salt or table salt, to taste.
- Use a light hand, because the chips shrink and the salt flavor concentrates.
-
Seasonings (pick 1–3 to keep it balanced):
- Garlic powder (not garlic salt)
- Onion powder
- Smoked paprika or sweet paprika
- Black pepper
- Italian seasoning
- Chili powder or chipotle powder for a little heat
- Nutritional yeast for a cheesy, dairy free vibe
- Grated Parmesan for a classic cheesy chip (adds a few calories but huge flavor)
-
Optional “extra crispy” helpers:
- 1–2 teaspoons cornstarch or arrowroot, to dust the slices very lightly
- This helps pull moisture from the surface and encourages crisp edges.
Pantry shortcuts and brand notes
- Use pre-grated Parmesan from the refrigerated section if you want speed, but avoid the shelf-stable green can style since it can burn faster.
- Store brand olive oil works fine here, since you bake it and do not need a fancy finishing oil.
- Pre-mixed seasoning blends like taco seasoning or ranch seasoning work, but choose low sodium versions so you avoid oversalting.
Equipment list
- Sharp knife or mandoline slicer
- Large cutting board
- Large bowl for tossing the slices
- Paper towels or clean kitchen towels
- 2 large baking sheets
- Parchment paper or silicone baking mats
- Wire cooling rack (helps chips stay crisp)
- Oven or air fryer
Tips & Mistakes
- Slice the zucchini very thin, about 1/16 inch, so the chips crisp instead of steam.
- Keep the slices the same thickness, since uneven slices cook at different speeds and some burn while others stay soft.
- Pat the slices dry before seasoning, because surface moisture blocks browning and crisping.
- Avoid crowding the pan; give each slice a little space so air can circulate.
- Use only a tiny amount of oil; too much oil turns the chips limp and greasy instead of crisp.
- Season lightly at first; you can always sprinkle more salt after baking, but you cannot fix oversalted chips.
- Bake at a moderate temperature, not too high, so the chips dry and crisp instead of burning at the edges.
- Rotate the pans and flip the chips once, so they cook evenly and do not stick.
- Watch closely near the end of baking, since they go from perfect to too dark in just a few minutes.
- Cool the chips completely on a rack, because they crisp more as they cool and stay that way longer.
How to Make Low Calorie Zucchini Chips
Step 1: Prep the zucchini
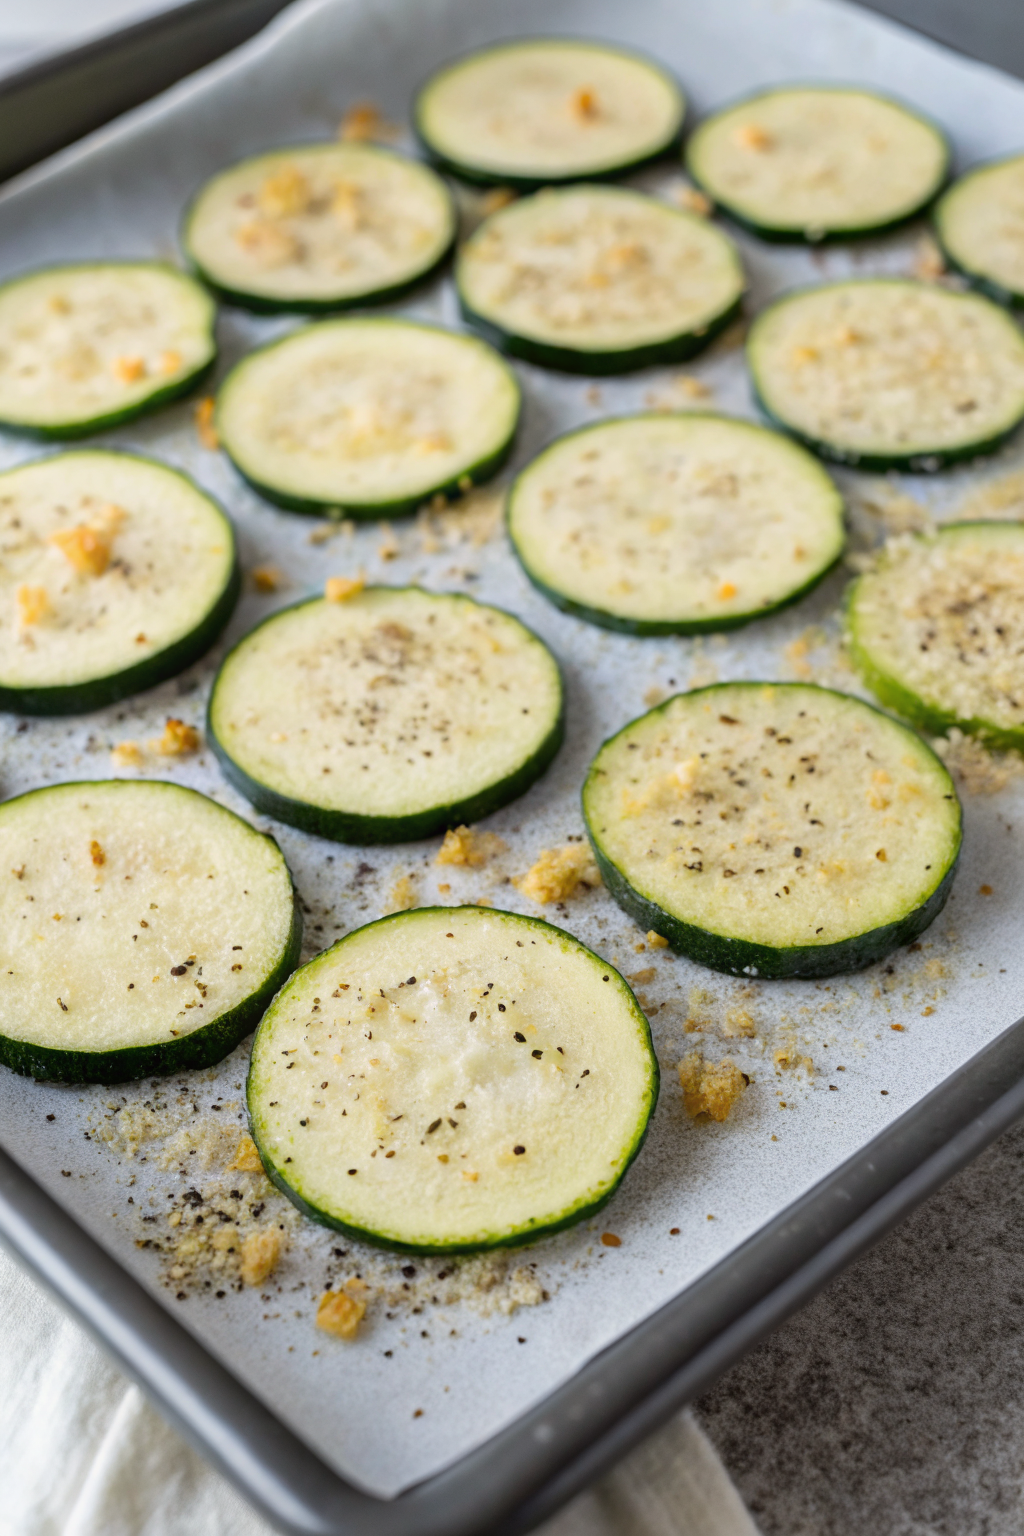
Wash the zucchini and dry them well. Trim the ends, then slice them into thin rounds, about 1/16 inch thick, using a sharp knife or mandoline. Lay the slices in a single layer on paper towels, sprinkle lightly with salt, and let them sit 10–15 minutes so they release some moisture.
Blot the tops of the slices with more paper towels to dry them. This step sets you up for crisp chips instead of floppy ones.
Step 2: Season the slices
Place the dried zucchini slices in a large bowl. Drizzle with 1 to 1½ teaspoons of olive oil or spray lightly with oil, then toss until every slice looks lightly coated. If you use cornstarch or arrowroot, sprinkle a teaspoon over the slices and toss again so it disappears into a thin, even coating.
Add your chosen seasonings and a pinch of salt. Toss once more so the spices cling to each slice.
Step 3: Arrange on baking sheets
Line two baking sheets with parchment paper or silicone baking mats. Spread the zucchini slices in a single layer on the sheets, leaving a little space between each slice so they do not overlap. If any slices fold or curl, flatten them so they bake evenly.
Check for big clumps of seasoning and shake them off so they do not burn. Lightly mist the tops with oil if they look dry.
Step 4: Bake until crisp
Preheat the oven to 225–250°F. Slide the baking sheets into the oven and bake for 30–45 minutes, depending on thickness and your oven. After about 20 minutes, rotate the pans and flip each slice with tongs so both sides dry evenly.
Start checking every 5 minutes once the edges look golden. Pull any chips that crisp early and place them on a wire rack while the rest finish.
Step 5: Cool and season to taste
Transfer all finished chips to a wire rack. Let them cool completely; they crisp more as they cool. Taste one chip and add a tiny pinch of extra salt or seasoning if needed.
Once cool, enjoy right away or store them correctly so they stay crunchy. If they soften a bit, you can re-crisp them with a quick warm up in the oven.
Air fryer option
Preheat the air fryer to 300°F. Arrange zucchini slices in a single layer in the basket or on the tray, with a little space between each slice. Air fry for 10–15 minutes, shaking the basket or flipping the slices halfway through.
Check early and often, since air fryers cook fast and can brown the edges quickly. Move finished chips to a rack while you cook the remaining batches.
Variations I've Tried
- Parmesan garlic chips: Toss the slices with olive oil, garlic powder, black pepper, and 2 tablespoons of finely grated Parmesan. The cheese melts, then crisps into tiny golden spots that taste like little flavor bombs.
- Smoky barbecue chips: Use smoked paprika, onion powder, garlic powder, a pinch of chili powder, and a tiny bit of brown sugar or zero calorie sweetener. This combo gives a barbecue chip vibe with fewer calories than bottled sauce.
- Spicy taco chips: Toss with a low sodium taco seasoning blend and a squeeze of lime juice after baking. These taste amazing with salsa or guacamole.
- Ranch style chips: Season with dried dill, parsley, garlic powder, onion powder, and a pinch of salt. Add a spoonful of nutritional yeast if you want a creamy, tangy flavor without dairy.
- Everything bagel chips: Sprinkle everything bagel seasoning lightly over the oiled slices. Go easy on extra salt, since that blend already includes salt.
How to Serve Low Calorie Zucchini Chips
Serve Low Calorie Zucchini Chips as a crunchy afternoon snack with hummus, Greek yogurt dip, or salsa. They also work as a side dish with grilled chicken, turkey burgers, or a big salad when you want something salty and crisp. Pack them in lunchboxes as a swap for regular chips, or set them out for game night with a trio of dips so everyone can mix and match.
How to store
- Room temperature: Keep fully cooled chips in an airtight container at room temperature for 1–2 days. Add a small piece of paper towel to absorb extra moisture.
- Fridge: Store in an airtight container in the fridge for up to 3 days; they soften a bit but still taste good.
- Freezer: Freezing does not work well for zucchini chips, since ice crystals form and ruin the texture, so skip the freezer.
- Reheating / re-crisping: Spread chips on a baking sheet and warm them in a 250°F oven for 5–10 minutes, then cool on a rack. In an air fryer, heat at 280–300°F for 3–5 minutes, checking often so they do not overbrown.
Low Calorie Zucchini Chips
Ingredients
Instructions
- Wash and dry the zucchini. Trim the ends and slice into very thin rounds, about 1/16 inch thick, using a sharp knife or mandoline.
- Lay the zucchini slices in a single layer on paper towels. Sprinkle lightly with salt and let sit 10–15 minutes to draw out moisture, then blot the tops dry with more paper towels.
- Place the dried slices in a large bowl. Drizzle with olive oil or avocado oil, or spray lightly with oil, and toss until the slices look lightly coated.
- If using cornstarch or arrowroot, sprinkle it over the slices and toss again so it forms a very thin, even coating.
- Add your chosen seasonings and a small pinch of salt. Toss once more so the spices coat all the slices evenly.
- Preheat the oven to 225–250°F. Line two baking sheets with parchment paper or silicone baking mats.
- Arrange the zucchini slices in a single layer on the prepared baking sheets, leaving a little space between each slice so they do not overlap. Flatten any folded slices and shake off clumps of seasoning.
- Bake for 30–45 minutes, rotating the pans and flipping the slices after about 20 minutes so they dry evenly. Begin checking frequently once the edges turn golden, removing any chips that crisp early to a wire rack.
- When all chips are crisp and lightly golden, transfer them to a wire rack and let cool completely. Taste and add a tiny pinch of extra salt or seasoning if needed, then serve.
Notes
Per serving (about 1/4 of recipe, made with 1 teaspoon olive oil and no cheese): 50–60 calories; fat 2–3 g; saturated fat 0 g; carbohydrates 7–8 g; fiber 2 g; sugars 5 g; protein 2 g; sodium will vary based on salt and seasoning used. Adding Parmesan or using more oil will increase calories and fat. Values are estimates and will vary based on exact zucchini size, oil amount, seasonings, and portion size.
Leave a Reply