
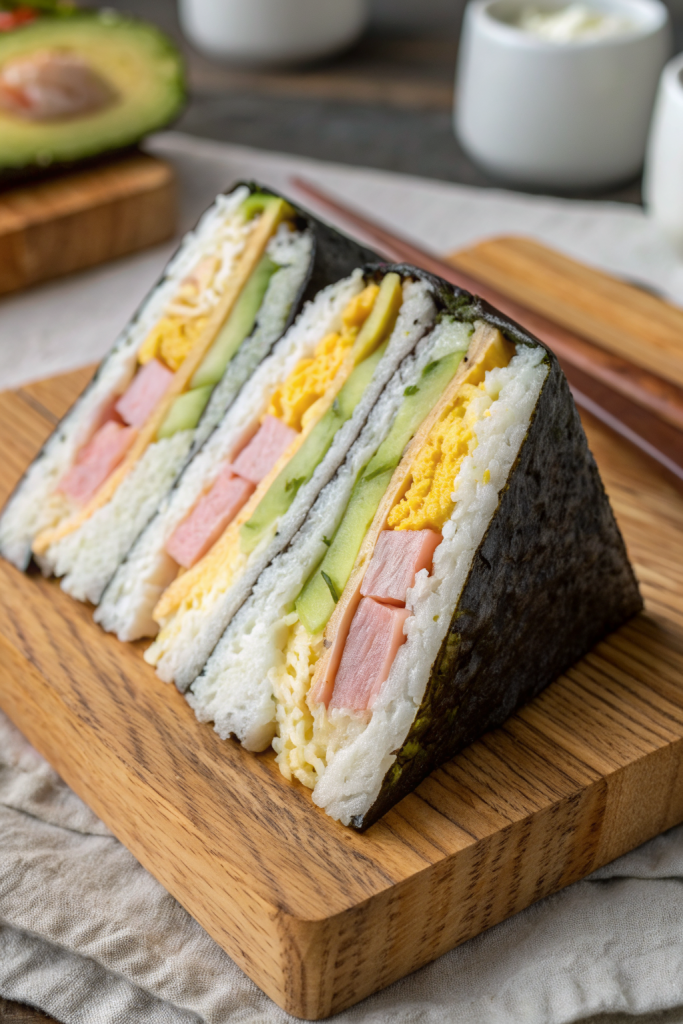
Onigirazu Recipe tastes like the best parts of sushi and a sandwich had a very tidy, very delicious baby, and it works perfectly for busy lunches, meal prep, or kid-friendly dinners in about 35–40 minutes. This Onigirazu Recipe suits beginners, bento lovers, and anyone who wants portable comfort food that does not fall apart in your hands. I ate my first one in a Tokyo train station and immediately knew I would chase that flavor in my home kitchen for years.
Why Make This Onigirazu Recipe at Home
Homemade Onigirazu costs a fraction of store-bought versions and lets you control every layer, from rice seasoning to fillings. You choose how saucy, how crunchy, and how healthy you want it, which beats a mystery convenience-store triangle any day.
You also pack it ahead for work, school, road trips, or picnics without worrying about leaks. It travels well, tastes great at room temperature, and feels fun enough that kids forget they eat actual vegetables.
“This Onigirazu Recipe tastes like a sushi roll and a hearty sandwich had a portable, lunchbox-friendly upgrade, and I could eat it every day. ★★★★★”
Ingredients You Need
Core ingredients
-
Cooked Japanese short-grain rice
- Use sushi rice or any short-grain Japanese rice.
- Avoid long-grain rice since it stays too loose and dry.
- Leftover rice works if you reheat it with a splash of water until soft and sticky.
-
Rice seasoning
- 2 tablespoons rice vinegar
- 1 teaspoon sugar
- 1 teaspoon fine sea salt
- Optional: 1 tablespoon furikake (rice seasoning mix) for extra umami and crunch.
- You can use seasoned rice vinegar and skip sugar and salt.
-
Nori sheets (seaweed)
- Use full-size sushi nori sheets, not snack-size.
- Choose roasted nori labeled “yaki nori” for best flavor and structure.
- If your nori feels soft, keep it in an airtight bag with a desiccant pack.
Protein options
Pick one or mix a couple:
-
Cooked chicken
- Leftover rotisserie chicken works great.
- Season lightly with soy sauce and a touch of mayo or sesame oil.
-
Tuna mayo
- 1 can tuna in water or oil, drained
- 2–3 tablespoons Japanese mayo (Kewpie tastes best, regular mayo works too)
- 1 teaspoon soy sauce
- Optional: a few drops of sriracha or chili crisp for heat.
-
Spam or ham
- Slice and pan-fry until golden on both sides.
- Brush with a little soy sauce and sugar mix for a teriyaki-style glaze.
-
Egg
- Tamagoyaki (Japanese rolled omelet) tastes amazing if you want to go classic.
- Scrambled or thin omelet works if you want a faster option.
Veggies and add-ins
Mix and match:
- Crisp lettuce leaves (romaine, green leaf, or butter lettuce)
- Cucumber sticks or thin slices
- Carrot matchsticks (raw or lightly pickled)
- Avocado slices
- Pickled radish (takuan) or other pickles
- Kimchi for a spicy version
- Sliced cheese if you want a fusion vibe
Sauces and flavor boosters
- Soy sauce or tamari
- Japanese mayo or regular mayo
- Sriracha, chili crisp, or gochujang mayo
- Toasted sesame oil
- Furikake or toasted sesame seeds
Pantry shortcuts
- Pre-cooked microwave rice saves time on busy days.
- Canned tuna, canned salmon, or leftover rotisserie chicken make quick fillings.
- Pre-washed salad greens and pre-cut veggies speed up assembly.
Equipment list
- Rice cooker or pot with lid
- Small bowl for seasoning the rice
- Cutting board
- Sharp knife
- Plastic wrap or parchment squares
- Small pan if you cook Spam, ham, or eggs
- Measuring spoons
- Clean kitchen towel for wiping your knife and hands
Tips & Mistakes
- Use warm, not hot rice so it stays sticky but does not steam the nori into sogginess.
- Wet your hands lightly before handling rice so it does not glue itself to your fingers.
- Keep fillings in a compact stack so they do not poke through the nori corners.
- Avoid overfilling; a fat square looks fun but splits open when you slice it.
- Place rice on both the bottom and top layers so the fillings stay locked in.
- Keep sauces in thin layers to avoid soggy rice and tearing nori.
- Wrap tightly in plastic wrap and let it sit 5–10 minutes so the square holds its shape.
- Slice with a very sharp knife and wipe the blade between cuts for clean halves.
- Use full-size nori sheets; smaller sheets leave gaps and cause leaks.
- Pack Onigirazu in snug containers so they do not slide around and open.
How to Make Onigirazu Recipe
Step 1: Cook and season the rice
Cook 2 cups of Japanese short-grain rice according to package directions or in a rice cooker. While the rice cooks, mix rice vinegar, sugar, and salt in a small bowl until the sugar dissolves. When the rice finishes, fluff it into a wide bowl and gently fold in the vinegar mixture and optional furikake.
Let the rice cool until warm but not hot. Cover it with a clean towel so it does not dry out while you prep fillings.
Step 2: Prep your fillings
Mix tuna, mayo, and soy sauce in a bowl until creamy if you use tuna. Pan-fry Spam or ham slices until browned, then brush with a little soy sauce and sugar mix if you want a sweet-savory glaze. Cook eggs as a thin omelet or soft scramble and slice into strips.
Wash and dry lettuce, slice cucumbers and carrots into sticks, and cut avocado just before assembly so it stays fresh. Set everything in small bowls so you build each Onigirazu quickly.
Step 3: Set up the nori and plastic wrap
Place a square of plastic wrap on your cutting board. Lay one full sheet of nori on top, shiny side down, so it looks like a diamond with a point facing you. This orientation makes folding easier and neater.
Keep a small bowl of water nearby to wet your fingers. Have your rice and fillings within arm’s reach so you move fast and keep the nori crisp.
Step 4: Add the first rice layer
Scoop about 1/3 to 1/2 cup of warm rice into the center of the nori. Wet your fingers and gently press the rice into a small square, about 3 inches by 3 inches. Keep the rice layer even and not too thick so the final square stays manageable.
Leave the corners of the nori bare so you fold them over the filling. Sprinkle a little furikake on the rice if you like extra flavor.
Step 5: Stack the fillings
Place a lettuce leaf on top of the rice square as a moisture barrier. Add your main protein, such as tuna mayo, chicken, or Spam, in a compact layer. Top with crunchy veggies like cucumber and carrot, then add avocado or cheese if you use them.
Drizzle a little mayo or sauce over the top, but keep it light so nothing leaks. Press the stack gently with your fingers to compact it slightly.
Step 6: Add the top rice layer
Scoop another 1/3 to 1/2 cup of rice and place it over the fillings. Use wet fingers to spread it into a square that matches the bottom rice layer. Cover the fillings completely so the rice seals everything inside.
Check that the stack stays centered on the nori. Adjust any pieces that stick out so they do not tear the seaweed when you fold.
Step 7: Fold the nori into a square
Start with the bottom corner of the nori and fold it up over the rice stack. Hold it in place with one hand, then fold the top corner down over the center. Fold the left and right corners in, just like wrapping a present.
Use gentle pressure to shape a tight square. If the nori feels stiff, wait a minute and the rice moisture will soften it as you hold it.
Step 8: Wrap and rest
Use the plastic wrap under the nori to wrap the Onigirazu tightly. Twist or fold the plastic at the sides so the square stays snug. Let it sit at room temperature for 5–10 minutes so the rice and nori settle and hold their shape.
You can chill it in the fridge if you pack it for later. Just keep it wrapped until you eat or slice it.
Step 9: Slice and serve
Place the wrapped Onigirazu on the cutting board. Use a very sharp knife and slice it in half diagonally or straight down the middle. Wipe the knife between cuts so the rice does not smear.
Serve the halves cut side up so the layers show. Add soy sauce on the side for dipping if you like.
Variations I've Tried
- Spicy tuna Onigirazu: Tuna, Kewpie mayo, sriracha, cucumber, and avocado with furikake rice. This one tastes rich, spicy, and super satisfying.
- Chicken teriyaki Onigirazu: Leftover teriyaki chicken, lettuce, carrot, and a little extra sauce over the rice. Kids usually inhale this version.
- Breakfast Onigirazu: Soft scrambled eggs, crispy bacon or sausage, cheese, and a little ketchup or mayo. It beats a drive-thru breakfast sandwich.
- Veggie Onigirazu: Avocado, cucumber, carrot, lettuce, pickled radish, and a drizzle of sesame mayo. It tastes bright, crunchy, and filling.
- Kimchi tuna Onigirazu: Tuna mayo, chopped kimchi, and lettuce with a tiny drizzle of sesame oil. This one brings big flavor with almost no extra work.
How to Serve Onigirazu Recipe
Serve Onigirazu at room temperature for the best texture, since cold rice turns firm and hot rice softens the nori too much. Pack it in lunchboxes with sliced fruit, edamame, cherry tomatoes, or a simple miso soup in a separate thermos. Add soy sauce packets, a small container of chili crisp, or extra furikake so everyone customizes their own bite.
You can also set up a DIY Onigirazu bar at home with bowls of rice, fillings, and sauces so friends or kids build their own squares. It turns into a fun, hands-on meal that still cleans up easily.
How to store
- Fridge: Keep Onigirazu wrapped tightly in plastic wrap or parchment, then place it in an airtight container and store it for up to 24 hours.
- Best texture window: Eat within 8–12 hours for the best nori texture and rice softness.
- Freezer: Freeze tightly wrapped Onigirazu for up to 1 month, but expect softer nori and slightly firmer rice after thawing.
- Reheating from fridge: Leave it at room temperature for 20–30 minutes or warm it very lightly in the microwave for 10–15 seconds, still wrapped, so the rice softens without cooking.
- Reheating from freezer: Thaw overnight in the fridge, then bring to room temperature or give it a quick 10–15 second microwave warm-up before eating.