
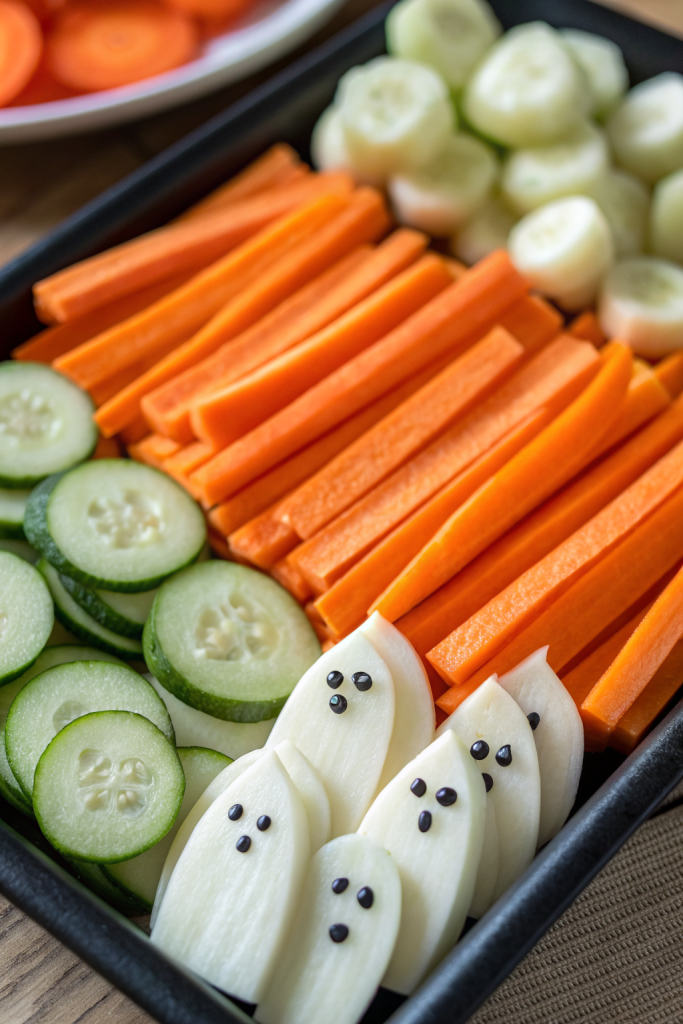
Spooky Veggie Plate Idea tastes crisp, fresh, and a little wicked in the best way, with creamy dips and crunchy veggies in every bite. It works perfectly for Halloween parties, kid-friendly snack boards, or office potlucks, and you can pull it together in about 25–30 minutes. I tested versions of this platter with my own kids and a very honest neighbor, so you get the version that everyone actually devoured.
Why Spooky Veggie Plate Idea Is Worth It
This Halloween veggie platter turns basic produce into goofy ghosts, monsters, and jack-o’-lanterns that kids and adults actually reach for. You pack in color, crunch, and nutrients while the table still looks fun and a little spooky.
You also prep everything ahead, which saves your sanity on party day. You use simple grocery store vegetables and a couple of easy dips, so you skip fussy techniques and still get a showstopper snack board.
“My kids fought over the cucumber eyeballs instead of the candy, which honestly felt like a Halloween miracle. ★★★★★”
Ingredients You Need
Think of this Spooky Veggie Plate Idea as a flexible template. You do not need every single item, but a mix of colors and shapes helps the spooky faces pop. I’ll list what I use for a big party platter, then you can scale down.
Base veggies (for shapes and faces)
- Baby carrots – great for “witch fingers” and pumpkin mouths.
- Whole carrots – slice into coins for pumpkin faces or cut into long sticks.
- English cucumber – slice into thick rounds for eyeballs and monster faces.
- Mini cucumbers – slice lengthwise for creepy “tongues” or “zombie fingers.”
- Celery stalks – use as bones, broom handles, or dippers.
- Red bell pepper – cut into strips for mouths, eyebrows, and pumpkin ribs.
- Orange bell pepper – carve like mini jack-o’-lanterns or slice into rings.
- Yellow bell pepper – adds brightness and contrast for eyes and noses.
- Green bell pepper – use for Frankenstein-style hair and monster mouths.
- Cherry or grape tomatoes – perfect as eyeball “pupils” and bloody details.
- Broccoli florets – build a “forest” or monster hair; prewashed bag works great.
- Cauliflower florets – use as ghost bodies or skull shapes.
- Sugar snap peas or snow peas – nice for monster ears or claws.
- Radishes – slice thin for spooky red-rimmed eyes.
Extras for details and fun
- Black olives (whole and sliced) – ideal for pupils, bolts, and spider bodies.
- Sliced green olives with pimentos – instant eyeball effect.
- Canned corn kernels – use as monster teeth; drain well.
- Canned black beans – use as eyes or mouths; rinse to keep them from staining.
- Fresh chives or green onions – use as stitches, hair, or whiskers.
- Fresh parsley or cilantro – tuck around edges for a “graveyard” feel.
Dips and spreads (store-bought shortcuts welcome)
- Ranch dip or dressing – classic crowd-pleaser; use your favorite brand.
- Hummus – plain or roasted red pepper; works great as “sand” or base for faces.
- Guacamole – looks like a bubbling cauldron or monster swamp.
- Greek yogurt dip – mix plain yogurt with ranch seasoning packet for a quick option.
- Salsa – chunky red salsa doubles as a “blood” dip.
- Optional: spinach-artichoke dip – adds a rich, cheesy option if you want it.
Decorative but edible extras
- String cheese sticks – slice into “bones” or pull into ghost shapes.
- Mini mozzarella balls (bocconcini) – top with olive slices for eyeballs.
- Cheddar or Colby Jack cheese slices – cut into bats, pumpkins, or tombstones with cookie cutters.
Equipment list
- Large platter, cutting board, or sheet pan (line with parchment if you want easy cleanup).
- Small bowls or ramekins for dips and “cauldrons.”
- Sharp chef’s knife and small paring knife (for carving pepper jack-o’-lanterns and details).
- Small cookie cutters (pumpkin, bat, ghost) if you have them, or use a knife.
- Paper towels (to pat veggies dry so they don’t slide around).
- Optional: toothpicks to secure stacked eyes or tall shapes.
Quick Tips & substitutions
- Use pre-cut veggie trays from the store and rearrange them into spooky shapes to save time.
- Pat all veggies dry so the pieces stick in place and the platter stays neat.
- Swap ranch for dairy-free dip or hummus if your guests avoid dairy.
- Use gluten-free crackers or chips on the side if you want crunch without gluten.
- Replace olives with sliced grapes or blueberries if your crew dislikes olives.
- Use jarred roasted red peppers instead of fresh if you want softer strips for mouths.
- Prep dips the night before and chop firm veggies (carrots, peppers, celery) ahead; slice cucumbers and tomatoes closer to serving.
- Keep a simple color rule: pair light veggies (cauliflower, cucumbers) with dark details (olives, beans) so faces show clearly.
How to Make Spooky Veggie Plate Idea
Step 1: Plan the layout
Decide on a theme: one big pumpkin face, a graveyard scene, or a mix of monsters and ghosts. I like a big pumpkin face in the center with smaller creatures around the edges. Place your empty platter on the counter and set out small bowls where you want dips, like “cauldrons” or “swamp pools.”
Think about color balance before you start chopping. Put green dips (guacamole) near orange veggies, and white dips (ranch, yogurt) near darker veggies. This contrast keeps everything visually fun and easy to recognize.
Step 2: Prep and slice the veggies
Wash and dry all veggies thoroughly. Peel carrots if you like a smoother look, or leave the peel for a rustic “witchy” vibe. Cut carrots into sticks and coins, slice cucumbers into thick rounds, and break broccoli and cauliflower into bite-size florets.
Slice bell peppers into strips and rings, then cut a few large flat pieces from the sides for carving faces. Use a small knife to cut triangle eyes and jagged mouths into those pepper panels if you want mini jack-o’-lanterns. Slice celery into sticks and smaller pieces for bones and broom handles.
Step 3: Build a big pumpkin face centerpiece
Place a bowl of hummus or ranch in the center as the “pumpkin core” if you want. Surround the bowl with overlapping carrot coins or orange bell pepper strips in a big circle to form the pumpkin shape. Tuck the pieces close together so the orange color looks solid.
Use cucumber rounds or green pepper pieces for eyes. Add sliced black olives or cherry tomato halves as pupils. Cut a curved strip of red pepper for a smile and add corn kernels as teeth if you want a silly grin.
Step 4: Add ghosts and skulls
Use cauliflower florets or slices of peeled cucumber as ghost bodies. Arrange three or four in a cluster on one side of the platter. Add tiny bits of black olive or black beans as eyes and mouths.
Shape a skull by grouping cauliflower florets into an oval, then add olive slices as hollow eyes and a row of corn kernels or tiny carrot bits as teeth. Use chives or green onion strips to add cracks or stitches on the skull. This section always gets comments, so take a minute to make it clear and fun.
Step 5: Build creepy eyeballs
Place thick cucumber rounds or mozzarella balls around the platter as eyeballs. Top each one with a slice of green olive or a small circle of black olive for the pupil. Add a thin ring of radish slice or a tiny smear of salsa for a bloodshot effect.
Cluster the eyeballs in groups of three or four to make them stand out. Put a few near each dip bowl so guests notice them as they reach for veggies. If any toppings slide, secure them with short toothpicks and warn guests about them.
Step 6: Make veggie monsters and Franken-faces
Use half bell peppers (hollowed out) as monster heads and fill them with dip or guacamole. Stick carrot sticks or celery into the sides as horns or ears. Add olive slices for eyes and red pepper strips for tongues hanging out.
Shape a Frankenstein-style face with a rectangle of green bell pepper or a tight group of broccoli florets. Use black olives for bolts and hair, and red pepper strips for a jagged mouth. Add chive “stitches” across the forehead or cheeks.
Step 7: Fill gaps and add “graveyard” details
Tuck broccoli, snap peas, and parsley around the edges to build a spooky forest or overgrown graveyard. Add cheese tombstones by cutting rectangles of cheese and trimming the tops into arches, then stand them upright against broccoli “bushes.” Use a food-safe marker or tiny olive bits to write “RIP” if you feel crafty.
Fill any remaining gaps with cherry tomatoes, radishes, and extra carrot sticks. Keep the shapes tight so the platter looks full and abundant. A full platter always looks more inviting and holds its shape better during the party.
Step 8: Chill and serve
Cover the finished platter loosely with plastic wrap and chill it in the fridge until serving time. Pull it out about 15 minutes before guests arrive so the veggies lose the fridge chill and taste crisp but not icy. Set small tongs or toothpicks nearby so people can grab pieces without wrecking the designs too quickly.
Keep extra veggies and dip in the fridge so you can refill bare spots. I like to refresh the eyeballs and faces halfway through the party, since those disappear first. Snap a photo before guests dig in, because this platter tends to vanish faster than the candy bowl.
Recipe Variations
- Gluten-free: Use naturally gluten-free dips (check labels on ranch and seasoning packets) and serve with gluten-free crackers or corn tortilla chips on the side.
- Vegan: Use hummus, guacamole, and dairy-free ranch or yogurt dip; skip cheese or swap in plant-based cheese slices and shreds.
- Low carb: Focus on cucumbers, celery, peppers, broccoli, cauliflower, and radishes; limit corn and beans and skip crackers.
- Spicy version: Add jalapeño slices, spicy hummus, and a chipotle yogurt dip; drizzle a little hot sauce over guacamole “swamp.”
- Kid-focused: Stick to milder veggies like carrots, cucumbers, bell peppers, and broccoli; keep designs simple with big eyes and smiles.
- High-protein: Add more Greek yogurt dip, extra hummus, and some cheese shapes; serve with hard-boiled egg “eyeballs” if you want more protein.
Ways to Serve Spooky Veggie Plate Idea
- Set it as the centerpiece of a Halloween snack table with fruit, popcorn, and themed cookies.
- Pack smaller versions in lunchboxes using bento-style containers with a mini ghost or monster face.
- Bring it to school parties or office potlucks as the “healthy” tray that still looks fun.
- Serve it as a pre-trick-or-treat snack so kids eat veggies before candy.
- Pair it with tomato soup or pumpkin soup for a cozy October dinner spread.
Storage Success
Store leftover veggies in airtight containers in the fridge, grouped by type so strong flavors do not transfer. Keep dips in separate containers, cover them tightly, and stir before serving again. Most veggies stay crisp for up to 2–3 days, though cucumbers and cut tomatoes taste best within 24 hours. If faces fall apart after the party, pack everything as simple snack boxes and enjoy easy grab-and-go veggies the next couple of days.