
How to Make Tuna Mayo Onigiri Recipe tastes like the best parts of a tuna salad sandwich wrapped in warm, salty rice and a crisp sheet of nori. It works perfectly for busy folks who want a fast lunch, snack, or meal prep option that comes together in about 30 minutes. I fell in love with tuna mayo onigiri during late-night study sessions in college, and I still make them when life feels a little too loud.
Why How to Make Tuna Mayo Onigiri Recipe Is Worth It
Tuna mayo onigiri hits that comfort-food sweet spot: creamy, savory filling tucked inside tender, lightly seasoned rice. The nori adds a toasty crunch and a hint of ocean flavor that makes each bite feel special, even if you eat it at your desk.
You also use simple pantry ingredients, so you skip any special grocery runs. Once you learn the shaping method, you can pack these rice balls in lunch boxes, road trip coolers, or picnic baskets without stress.
“These tuna mayo onigiri taste like convenience store snacks leveled up at home, and they disappear from my fridge in a day. ★★★★★”
Ingredients You Need
For the rice:
- 2 cups uncooked Japanese short-grain rice (sushi rice works great)
- 2 1/4 cups water (for cooking the rice; adjust if your rice brand suggests a different ratio)
- 1 teaspoon kosher salt
- 1–2 teaspoons rice vinegar (optional, adds brightness)
- 1/2 teaspoon sugar (optional, balances the vinegar)
For the tuna mayo filling:
- 1 (5–6 ounce) can tuna in oil, drained
- Use tuna in water if you prefer a lighter taste, but tuna in oil gives richer flavor.
- 3–4 tablespoons Japanese mayonnaise (Kewpie gives the most authentic flavor, but any good mayo works)
- 1–2 teaspoons soy sauce (use tamari or coconut aminos for gluten-free)
- 1 teaspoon rice vinegar or lemon juice
- 1–2 teaspoons finely chopped green onion or chives (optional, adds freshness)
- 1 teaspoon sesame oil (optional, for a nutty note)
- 1 teaspoon toasted sesame seeds (optional, black or white)
- Freshly ground black pepper, to taste
For assembly:
- 4–6 full sheets nori (roasted seaweed), cut into strips or rectangles
- Use onigiri-specific nori if you find it; it stays crisp longer.
- Extra salt for your hands (about 1–2 teaspoons in a small dish)
- Small bowl of water for dipping your hands
Equipment list:
- Rice cooker or medium saucepan with lid
- Fine-mesh strainer (to rinse the rice)
- Mixing bowls (one for rice seasoning, one for tuna filling)
- Rice paddle or spatula
- Sharp knife or scissors (to cut nori)
- Kitchen scale or measuring cup (helps portion rice evenly)
- Optional onigiri mold (nice but not necessary; your hands work perfectly)
Quick Tips & substitutions
- Rinse the rice until the water runs almost clear so the grains cook fluffy, not gummy.
- Use warm rice for shaping; cold rice turns firm and cracks when you press it.
- Wet and salt your hands before shaping so the rice does not stick and the outside seasons evenly.
- Swap Japanese mayo with regular mayo plus a tiny pinch of sugar and extra yolk-rich mayo if you have it.
- Use tuna in water and skip sesame oil if you want a lighter filling.
- Replace soy sauce with tamari or coconut aminos to keep the tuna mayo onigiri gluten-free.
- Add a little sriracha, gochujang, or chili crisp to the filling if you like a spicy kick.
- Wrap the nori right before eating if you want it crisp; wrap earlier if you prefer a softer, chewy texture.
- Use an onigiri mold if shaping by hand feels tricky; pack the rice gently so it still feels tender.
- Keep a small bowl of water nearby and re-wet your hands often so the rice shapes smoothly.
How to Make How to Make Tuna Mayo Onigiri Recipe
Cook and season the rice
-
Measure the rice into a fine-mesh strainer and rinse under cold water. Swirl the rice with your hand and drain the cloudy water, then repeat until the water looks mostly clear. Let the rice drain for 10–15 minutes so extra water drips off.
-
Add the rinsed rice and measured water to a rice cooker or saucepan. Cook the rice according to your rice cooker instructions, or bring it to a boil on the stove, then cover, lower the heat, and simmer for about 12–15 minutes until the water absorbs. Turn off the heat and let the rice sit, covered, for another 10 minutes so the steam finishes the cooking.
-
While the rice rests, mix the salt, rice vinegar, and sugar (if using) in a small bowl until the sugar dissolves. Transfer the hot rice to a large bowl or leave it in the cooker on warm. Sprinkle the seasoning mixture over the rice and gently fold with a rice paddle so you do not crush the grains.
-
Spread the rice slightly in the bowl so steam escapes and the rice cools to warm, not hot. You want the rice warm enough to stick together but cool enough so your hands do not burn. Cover the bowl with a damp towel to keep the rice from drying out while you make the filling.
Mix the tuna mayo filling
-
Drain the canned tuna very well so the filling does not turn watery. Add the tuna to a medium bowl and break it into small flakes with a fork. Aim for small pieces so the filling spreads evenly inside the onigiri.
-
Add the mayonnaise, soy sauce, rice vinegar or lemon juice, sesame oil, sesame seeds, and black pepper. Stir until the tuna turns creamy and everything looks evenly mixed. Taste and adjust with more soy sauce for salt, more mayo for richness, or more acid for brightness.
-
Stir in chopped green onion or chives if you use them. The herbs add color and a fresh bite that balances the creamy tuna. Set the filling aside while you shape the rice.
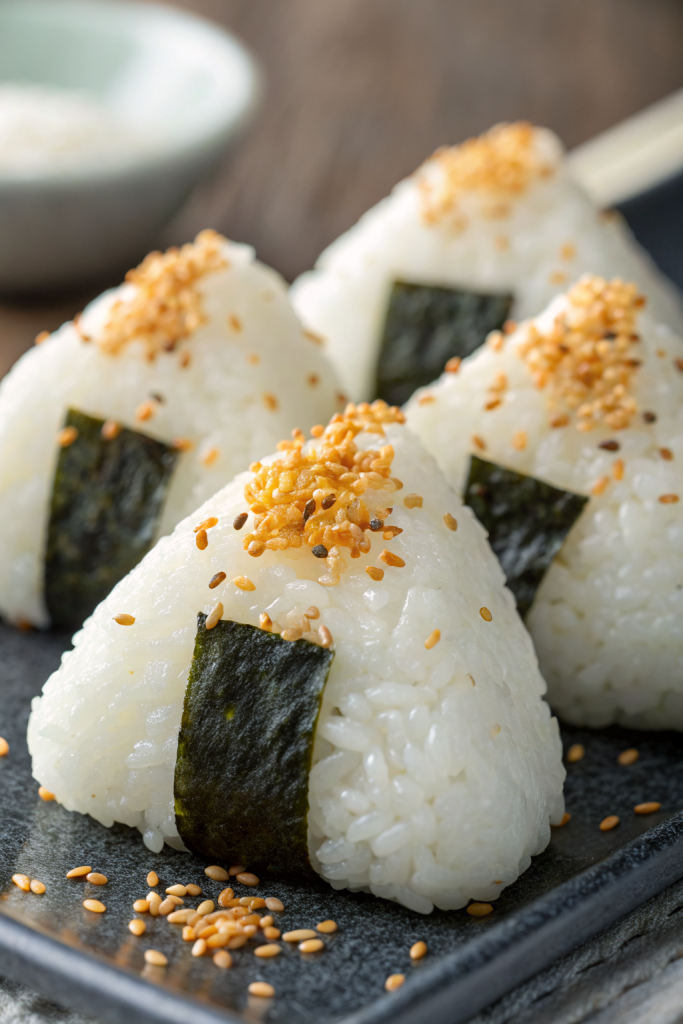
Shape the rice balls
-
Set up a small bowl of water and a small dish of salt next to your rice. Cut the nori sheets into strips or rectangles that fit around or under each onigiri. Keep everything within easy reach so you move quickly while the rice stays warm.
-
Wet your hands lightly with water, then tap your fingertips into the salt and rub your hands together. Scoop about 1/2 cup of warm rice into your palm. Press it gently into a rough ball or oval, leaving a shallow indentation in the center.
-
Spoon 1–2 tablespoons of tuna mayo filling into the indentation. Cup your other hand over the rice and gently press more rice over the top if needed to cover the filling. Seal the filling inside by pressing the rice around it with light but firm pressure.
-
Shape the rice into a triangle by cupping your hands. Use one hand as the base and the other hand as the top point, then rotate the onigiri as you press. Keep the pressure gentle so the rice sticks together but still feels soft and fluffy.
-
Repeat with the remaining rice and filling. Wet and salt your hands again between each onigiri so the rice does not stick. Adjust the size of each onigiri based on how you plan to serve them; smaller ones work great for kids or snack plates.
Wrap with nori
-
Take one strip or rectangle of nori and place it shiny side out. Press the bottom of the onigiri onto the nori so it sticks. Wrap the nori up the sides, or leave the top exposed if you like the classic look.
-
If you plan to eat the tuna mayo onigiri right away, wrap the nori fully so it turns slightly soft and chewy. If you want crisp nori later, pack the nori separately and wrap it just before eating. Repeat with all the rice balls.
-
Serve the onigiri warm or at room temperature. Pack them in a lunch box with an ice pack if you plan to eat them later in the day. Add a small container of extra soy sauce or a little chili sauce if you like dipping.
Recipe Variations
- Gluten-free version: Use tamari or coconut aminos instead of soy sauce and check that your nori and rice vinegar list gluten-free on the label.
- Vegan version: Swap tuna with mashed chickpeas or mashed firm tofu, use vegan mayo, and season with soy sauce or tamari, sesame oil, and nori flakes for a sea flavor.
- Low-carb tweak: Use a mix of cauliflower rice and regular rice, or use all cauliflower rice and press it gently; chill it first so it holds shape better.
- Spicy tuna mayo onigiri: Add sriracha, chili crisp, or a spoon of gochujang to the tuna mayo filling.
- Extra protein: Mix in chopped boiled egg or a bit of shredded cooked chicken with the tuna.
- Crunchy version: Add finely diced cucumber, pickled radish (takuan), or celery to the tuna filling.
- Furikake rice: Mix furikake seasoning into the rice before shaping for extra umami and crunch.
Ways to Serve How to Make Tuna Mayo Onigiri Recipe
- Pack in bento boxes with sliced cucumbers, cherry tomatoes, and orange wedges.
- Serve as an easy lunch with miso soup and a simple green salad.
- Offer on a snack platter with edamame, cut fruit, and carrot sticks.
- Bring on road trips in a cooler as a tidy, hand-held meal.
- Serve as part of a family “onigiri bar” with different fillings and toppings so everyone builds their favorite combo.
Storage Success
Place leftover tuna mayo onigiri in an airtight container and chill them in the fridge for up to 24 hours. Wrap each one tightly in plastic wrap or beeswax wrap so the rice does not dry out. Keep the nori separate if you want it crisp, and wrap it just before eating. Eat chilled onigiri straight from the fridge or let them sit at room temperature for 20–30 minutes so the rice softens and the flavors bloom again.

How to Make Tuna Mayo Onigiri Recipe
Ingredients
Instructions
- Rinse the rice under cold water until the water runs mostly clear, then drain.
- Cook the rice with 2 1/2 cups of water in a rice cooker or on the stovetop according to package directions. Let it rest covered for 10 minutes after cooking.
- In a bowl, combine drained tuna, Japanese mayonnaise, soy sauce, rice vinegar (if using), and a pinch of salt. Mix until evenly combined and creamy.
- Transfer the cooked rice to a wide bowl and gently fluff with a rice paddle. Allow it to cool until it is warm but comfortable to handle. Sprinkle about 1/2 teaspoon salt over the rice and fold gently.
- Prepare a small bowl of water and a pinch of salt. Wet your hands lightly with water, then rub a little salt onto your palms.
- Scoop about 1/2 cup of warm rice into your hand and flatten it slightly to form a small disk.
- Place about 1 to 1 1/2 tablespoons of the tuna mayo mixture in the center of the rice disk.
- Gently fold the rice around the filling, sealing it inside, and shape into a triangle or round ball by pressing lightly with your hands.
- Wrap a strip of nori around the bottom or sides of each onigiri, shiny side out.
- Repeat with the remaining rice and filling. Serve immediately, or wrap individually for a portable lunch.
Notes
Approximate per 1 onigiri (1 of 4): 290 calories; fat 9 g; saturated fat 1.5 g; carbohydrates 40 g; fiber 1 g; sugars 1 g; protein 11 g; sodium 520 mg. Values will vary based on brands, add-ins, and portion size.
Leave a Reply